Monday, April 20, 2020

Cheeky Peach: Creative Stencils with Your Stash


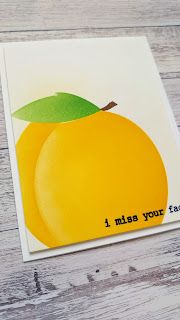
A few weeks ago I got an idea in my head for a saucy, peach themed card. In my head the star of this card was a large, stenciled peach. The only problem is, I don’t have a stencil of a peach. But I had my heart set on making this card. For the sentiment on this card to work I NEEDED a peach. So I looked through the supplies. The only peach stamp I have is a very tiny one. I attempted to make this card with it.  It was alright, but it wasn’t what I had envisioned. So I decided to make my own stencil. And it worked! I am so happy with how this card turned out.


Front of Card: I miss your face
Inside of Card: And your booty. But mostly your face.

When possible, I save product packaging.  Whether it’s pretty cardstock, cello bags, or acetate, it finds a home in my craft room. To make my stencil I used thick acetate from old packaging. All the details on how I made this card are listed in the YouTube video below.


Supplies
Versamark Embossing Ink


Sunday, April 12, 2020

Card Share: Echo Park Hello Easter Kit


Happy Easter y’all!  Last week I made a handful of Easter cards using Echo Park’s Hello Easter kit.  I wanted to share those cards with you today on my blog and youtube channel. The kit was adorable and featured lots of bright spring and Easter themed pattern papers and stickers. Include in the kit were 12 double sized 12"x12" patterned papers and a sticker sheet. In addition to the kit, I used vellum, gold foil paper, and a few Easter stamp sets for sentiments, and various sequins from my stash.


To finish the inside of each card I stamped a sentiment and added a matching strip of patterned paper at the bottom. Each card also has a matching envelope.


I am happy with the cards I was able to make, though it took some time for me to get into my creative groove with this set. I talk more about that and how I found my groove in the card share video below. I didn’t use the entire kit and still have lots of papers and stickers left over that I hope to use in the future to make more cards. 


Here's a look at all the cards I made:


Supplies Used
Echo Park - Hello Easter kit*
Neat & Tangled - Eggstra Special*

* I couldn't find links to these products. Sorry crafty friends.

Saturday, April 4, 2020

CAS Lemon Blossom

Yall, I love all things lemon. They are bright and beautiful to look at, they taste amazing in any form, and they have the most cheerful, uplifting aroma. And they make me think of sunshine. So I made a clean and simple lemon themed card that just sings spring to me.
The star of this card is the Lemon Blossom stamp set from The Greetery. I purchased this set back in December, but am just now getting around to it. The images are beautiful and because it’s a layering stamp set the images have a realistic look. And I love that the set had some fun,cheeky sentiments. I am excited to make more cards with it.

For the first layer of the lemons I used Waffle Flower’s You Said What ink. For the second layer of the stamp I used Memento’s Cantaloupe ink.  When I remade this card a week or two later I used Waffle Flower’s Oh Happy Day ink, a bright orange, for more prominent detail. For the leaves I used Memento Pear Tart for the first layer and Cottage Ivy or the second.  Once everything was stamped I used the matching dies to cut the images out.


To make the background of the card I did some ink blending on a 4” x 5.25” for panel of 80#cardstock.Using painter’s paint I masked off the outer edges of the card panel. I grabbed Waffle Flower’s Peace of Mind and New Fish in Pod inks to do some gradient ink blending.

To stamp my sentiment I used Versafine Onyx Black ink. I did a little bit of masking on the stamp to make the message I wanted. The original stamp read “you are my main squeeze”.I masked the sentiment so my card would read “my main squeeze.” With the sentiment done I added the die cuts to the panel. I used foam tape to adhere the panel to a standard A2 card base. A sprinkle of sequins finished the front of the card.


For the inside of the card I stamped a sentiment from Stampin’ Up and glue a die cut lemon slice to the inside of the card. And voila, card complete!


For full details on how I made this card check out the video below. Happy crafting!https://youtu.be/aMxruCLG84A


What did I use?
Stampin’ Up - Picture Perfect Birthday

Finishing Up an Old Project Using my Crafty Stash

My biggest crafty goals for 2021 are: Use my giant hoard of patterned papers Donate more cards! So far I'm off to a good start. The firs...